
Shooting the moon is an amazing experience, mainly if you are willing to explore a little. You can learn different useful techniques along the way – reducing camera shake in low-light conditions, manually setting your camera, using the sunny 16 rule, stacking photographs in Photoshop and even including the moon into other photos.
The Sunny 16 Rule
What is it that illuminates the moon? Have you thought this simple point? It is the sun, our star.
When you go out to photograph a farm in the middle of an open field on a sunny day, what settings should you put on your camera? Do you know the “sunny 16 rule?
The rule of “sunny 16” tells us that on our planet, in the middle of the sunny day, an object directly illuminated by the sun correctly exposes at an exposure speed equal to the inverse of ISO in ƒ / 16. Wow! In other words, if you have ISO 100, on a sunny day the farm illuminated by the direct rays of the sun will expose correctly to 1/100 of a second in ƒ / 16 (or any equivalent exposure to this).
So how do you think it correctly exposes the full moon that is directly illuminated by the sun on a perfectly clear night (no fog, clouds, or haze)? Eureka!!! Exactly the same as the farm.
Surely now, many serious professional and amateur photographers will think … “These gentlemen are crazy … that is not possible.” And indeed, this is very rarely possible, since it is very difficult to think that there can be such a clear night that there are no microscopic objects between your camera and the moon that “darken” your image. But what is certain is that if the moon were at the same distance from your camera as the farm, it would be absolutely true.
It is also extremely important to understand that the reason you generally cannot get a good moon exposure using the sunny 16 rule is not that the moon is far away, but because there are millions of particles between your lens and the moon, air, oxygen, hydrogen, dust, etc. which makes the sunlight reflected on the moon not come “clean”.
Apply the Sunny 16 Rule to the Moon
What to do then? If the night is “in your eyes” clear, and you see the bright white moon perfectly with the naked eye, generally applying a brief modification of the rule of sunny 16 will give you excellent results. ” You have 3 options:
- Lower your speed by a third.
- Increase the ISO a third (not so recommended because you increase the noise of the ISO).
- Open your diaphragm one third.
Just a third? Again some professionals who do not master the subject of how the sun exposes and who have not meditated that the moon is illuminated by the sun, like a boat or a beach or a farm in the middle of the sunny day, will say: false….!!! That is not possible. Let’s save time and avoid discussion by looking at this photograph I took on January 20, 2019, on the day of the lunar eclipse (“blood moon”) in Mexico City. (Note that Mexico City is not characterized by having a very clean atmosphere).
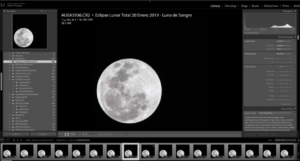
As you can see on this screen captured from my Adobe Lightroom program, the photo was taken in ƒ / 16, ISO 100 and, instead of 1/100 of a second, it was taken at 1/60 of a second, that is, at one speed a third slower than the rule of “sunny 16”.
In the following photograph, you can see a close-up of the same photograph:

How to Get Better Photos of the Moon
Do you want to get better pictures of the moon? To achieve this, simply make these adjustments and you will see how your photos will be of better quality:
First of all, always make sure to pack a tripod for this type of session. When it comes to low-light photography (something that inevitably happens with all night shots), a tripod is probably the most important tool to use. Especially since your subject, in this case, is quite far away, you really need your camera to move as little as possible. The slightest movement of your hand will dramatically damage the quality of this image. A tripod will always be your safest bet.
Second, be sure to use the most effective shutter speed. It’s important to note that the moon is moving – you’re technically photographing a moving subject, so a slow shutter speed just won’t do the job. Go for something faster, like 1/100 or 1/125 of a second.
If you have a telephoto or telephoto lens at your disposal, consider using it to get the best shots. This is the best tool you can use to really capture all the details on the moon’s surface. Without a lens as powerful as this one, chances are you won’t be able to see the smallest details and you won’t get what you’re looking for.
Conclusion
Finally, be sure to remove all filters from your camera lens before you begin. With a long-distance shot and as focused as this, you should take all possible measures to avoid any kind of distortion. The best way to do this is to remove all filters from your lens, including UV filters.


")